
STOP! Before you do anything, save a copy of your GRBL settings.
Introduction
I made the switch from GRBL v0.8 to v1.1 a few months back. The following details the lessons I learned. Hopefully, this will save you some time and frustration.
You might be wondering, “Tim, why did it take you so long to make your GRBL update.” After all, GRBL v1.1 has been out for a long time. The simple answer: my machine worked, and I didn’t want to break it. At this point, I would rather spend my time making parts than fiddling with my machine. After all my CNC mill is a tool to be used.
If you decide to update to GRBL v1.1 you will also need to update your version of Universal Gcode Sender (UGS) to either 2.0 Classic or 2.0 Platform. The changes in GRBL v1.1 make this software version incompatible with older versions of UGS. If you have not setup your Arduino based CNC controller, click here for a detailed post on setting up your controller.
GRBL Update
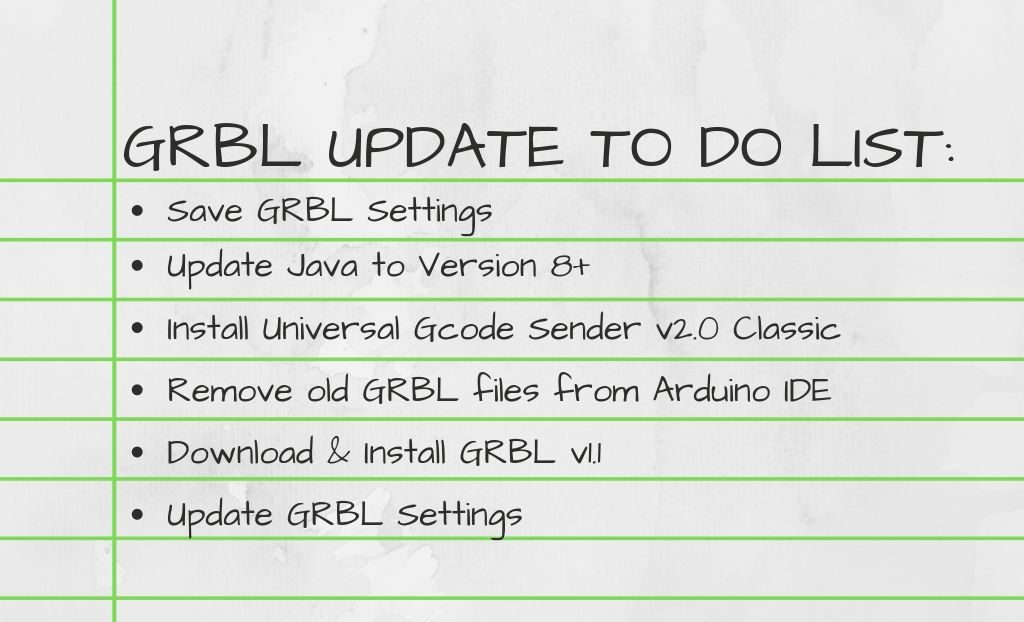
I used the following steps in my GRBL update process. Each of these are detailed in the following sections.
1 – Save a Copy of Your GRBL Settings
2 – Update Java to version 8+
3 – Install and Test Universal Gcode Sender V2.0 Classic (or Platform)
4 – Remove old GRBL files from Arduino IDE
5 – Download & Install GRBL v1.1
6 – Update GRBL Settings
SAVE Your GRBL Settings
The first step in the GRBL Update process is to save a copy of your existing GRBL settings. When you make the update to v1.1, all the GRBL settings will be reset to defaults. You have likely spent time tuning these settings for your machine. You don’t want to start from scratch and have to redo all of your work.
The following steps oultine the process to save a copy of your GRBL settings.
Step 1 – power on your CNC machine, launch Universal Gcode Sender and connect to your machine.
Step 2 – Type “$$” in the console section of Universal GCode Sender and then press enter.
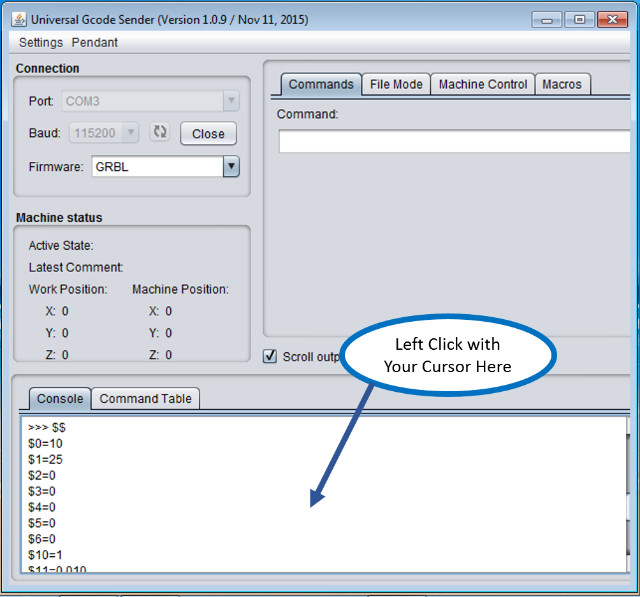
Save GRBL Settings
Step 3 – Left click with your mouse in the console section. These are your GRBL settings.
Step 4 – Hold down the “CTRL” key and press the “A” key to select all of the text.
Step 5 – Hold down the “CTRL” key and press the “C” key to copy all of the text.
Step 6 – Open a text editor in my case I used “Notepad”
Step 7 – Once in “Notepad” Hold down the “CTRL” key and press the “P” key to paste all of your GRLB settings.
Step 8 – Save this text file using “Notepad”
Now that you have a copy of your GRLB setting safely saved to your PC, it’s time to walk through the rest of the GRBL Update steps.
Update Java to version 8+
Navigate to the following link to update Java.
Click Here to Download the Latest Java Version
I used the “Windows Offline” option since the Netbook I use to run my CNC machine is not connected to the internet.
Choose the option that is right for you and follow the installer prompts.
Install and Test Universal Gcode Sender V2.0 Classic (or Platform)
I ran into some trouble here too. I had to download the nightly builds version to get UGS to run on my netbook. See the link and image below for where to find the download.
Click Here for the Universal Gcode Sender Downloads
I started with the “2.0 Platform” version since I was very intrigued by the option to use a real time feed rate override. However, since I had problems, I went back and used the “2.0 Classic” to get everything working.
I recommend you start with the “2.0 Classic”. Especially if you are familiar with any of the previous Universal Gcode Sender version. The classic is essentially the same interface but with back end updates to support GRBL v1.1
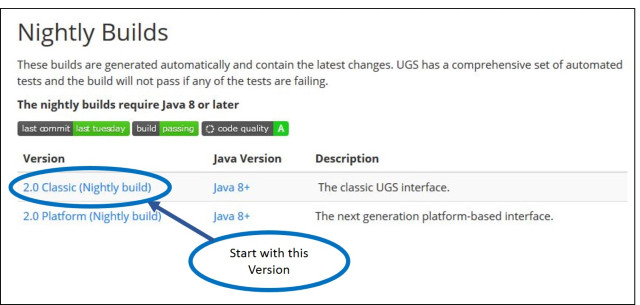
Universal Gcode Sender (UGS) Nightly Builds Download
Remove old GRBL files from Arduino IDE
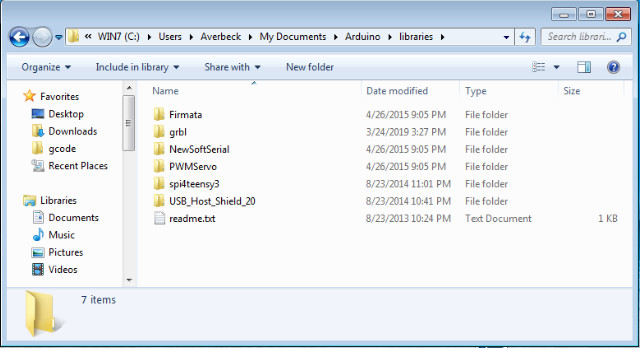
This is another place I got tripped up in my GRBL update process. I kept reloading my original version of GRBL until I realized I must delete the original files from the IDE library folder.
You will need to delete the old GRBL rev from your Arduino IDE Library. The files are not located in the Arduino directory on your computer. Mine were in the “My Documents” directory.
The file path looked like this C\ Users\ Averbeck\ My Documents\ Arduino\ Libraries
This is the location used once you have added the GRBL Library to the Arduino IDE.
Once the old version is deleted, you can launch the Arduino IDE and install the new GRBL library. See the image below…
GRBL Update – Location of Original GRBL files in Arduino IDE Included Libraries
Download & Install GRBL v1.1
Once the old GRBL files are removed from the Arduino IDE, it’s time to download the new GRBL v1.1 files.
Click Here for the GRBL v1.1 Download
Download GRBL v1.1
Click the “Clone or download” button on the right side of the screen. Then click the “Download ZIP” button.
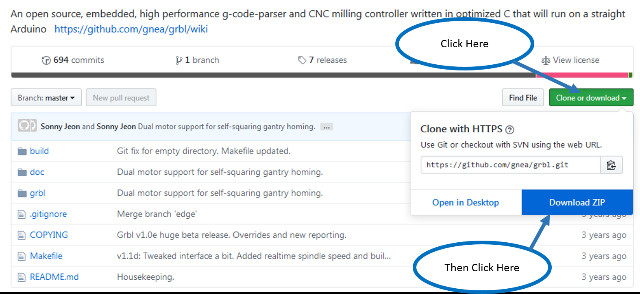
This will create a “grbl-master.zip” folder in your downloads folder.
Right click on this folder and extract into your Arduino directory.
To install GRBL v1.1 on your Arduino, you will need to add the new GRBL Library to the Arduino IDE.
Launch the Arduino IDE and click “Sketch” at the top, then “Include Library” and then navigate down the menu and click “grbl” See the image below for an example.
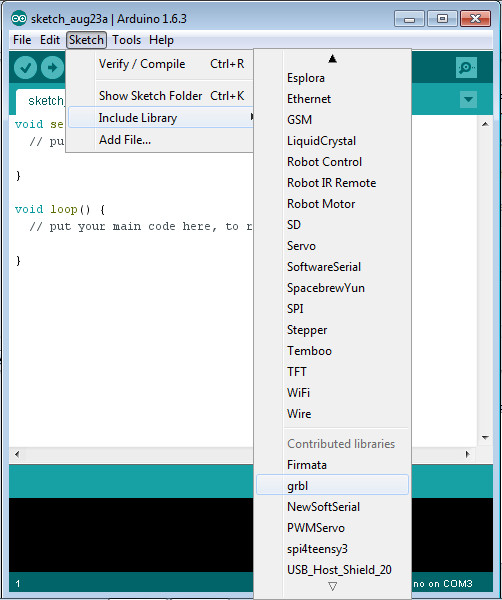
Add the GRBL Update v1.1 to the Arduino Library
Install GRBL v1.1
Once the GRBL Library is added to the Arduino IDE, you will need to connect your PC to your Arduino via the USB cable. Once connected, load the GRBL sketch to your Arduino per the following:
Step 1 – Select your Arduino board under the “Tools” then “Board” menus. For most this will be Arduino Uno.
Step 2 – Select the serial port under the “Tools” then “Serial Port” menus.
Step 3 – Click “File” then “Examples” and scroll to “grbl” then click “grblUpload“.

Load the GRBL Update Skectch V1.1 to the Arduino
Step 4 – Click the “Upload” sketch button (Button that looks like an Arrow pointing to the right) to send the GRBL software to your Arduino.
Step 5 – Confirm the GRBL update was successful when you get a “Done uploading.” message.
Note, you will likely get a “Low memory available, stability problems may occur.” warning. This is ok. GRBL v1.1 uses almost all of the available memory on the Arduino Uno.
Update GRBL Settings
The last step in the GRBL Update process is to test GRBL v1.1 and Universal GCode Sender 2.0 Classic or Platform. Connect your PC or Laptop to your CNC machine, power on the machine and launch UGS.
Establish a connection between UGS and the machine by selecting “Open” just as before in the earlier version of UGS and confirm you get the following feedback in the “Console” window.
**** Connected to COM# @ 115200 baud ****
Grbl 1.1 [‘$’ for help]
Jog the machine around carefully to see that all the feedback and machine position values update as expected.
Next, it’s time to update the GRBL settings.
Locate the file you saved earlier and open it in your favorite text editor.
Adjust the size of UGS and the text editor so they sit side by side. See the image below for an example of how I setup my screen for this process.
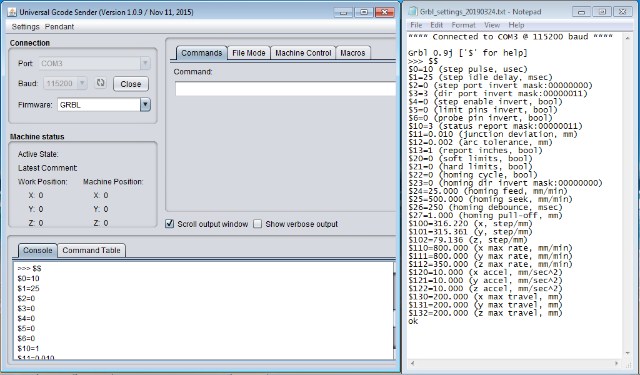
GRBL Update – Match the Priginal Settings
Type $$ in the Command: line box and press enter. Look for the GRBL v1.1 settings in the Console Tab.
Go line by line and update the GRBL settings from the file you saved by typing $ with the setting number followed by the new setting value and then pressing enter.
For example, to update the X step/mm setting $100 to a value of 316.22, you would type the following:
$100=316.22
This is a little tedious but I do not know of a faster way to import GRLB settings.
Conclusion
Wow! That’s quite the process. I spent the better part of two hours trying to get this installed on my old Netbook. Stay with it, you can do it!
If you want to run a quick test, click here to download the Circle.nc example gcode program.
Also, for those of you using Fusion360, GRBL v1.1 does not like the tool change call outs in the gcode. For now, I manually delete these. I will likely look to modify the GRBL post processor for Fusion360 to remove the tool change calls. This is a topic for another post.
I am yet to get the UGS 2.0 Platform setup the way I want it. I really liked that way the original UGS jog commands worked using the arrow keys for X & Y then the FN + Arrow keys for Z jogging. Unfortunately, UGS 2.0 Platform cannot be setup to match this same behavior. I will need to map new keys and then learn those. Nonetheless, that is a conversation for another post.
Let me know if you have any questions or feedback in the comments section below… As always, feel free to contact me directly at Tim@DIYMachining.com
Thanks for reading. Until next time… Tim
Tim, very nicely done tutorial.
Unclear how grbl is deleted on the pc and deleted from Arduino?
In the end I used Xloader to flash my arduino
Cheers
Walter
Hi Walter, I appreciate the feedback. Glad you found a path that worked for you. There is no need to delete GRBL from the Arduino. Each time you write (download) a program to the Arduino, it replaces the old one. The part that caused me issues was the fact that I needed to remove the GRBL 0.8 references in the Arduino IDE library folder.
I have tried several times to do the upgrade, carefully to follow every step. I have ver 0.9 and don’t have full control of the machine. I have tried it with the laser on and off, is there something basic I am missing? I have the latest IDE. I don’t know what else to try. I have an Eleks 3A pro with mana 3.2 board and a 3000ma led laser. Suggestions please? Need I remove the UNO from the board?
Dennis, I appreciate the comment. When I upgraded to GRBL V1.1, I left the control board connected to the Arduino. I also had to upgrade the code sender version. In my case, I had to upgrade to the latest version of Universal Gcode Sender (UGS). What gcode sender are you using? Have you verified the version you are using is compatible with GRBL v1.1? Let me know what you find.
grbl controller
I am using an XY plotter with a Deesbot control board, which currently runs on GRBL firmware. The board has two Y-axis motors, and I want to integrate two additional servos alongside the existing pen-lift servo. Additionally, I have limit switches that need to trigger specific events. My goal is to implement a customized firmware solution that allows me to independently control each motor and servo, as well as respond to limit switch inputs. Requirements: 1. Custom Firmware Development: • Modify or rewrite the GRBL firmware to support independent control of two additional servos. • Ensure each servo/motor can be controlled with unique G-code commands (e.g., M03 for Pen Servo 1, M05 for Servo 2, etc.). • Map unused pins/ports on the Deesbot board for these servos and limit switches. 2. Limit Switch Integration: • Program the firmware so that when specific limit switches are triggered, corresponding actions (e.g., stopping motion, activating a servo) are executed. 3. Unique Pin Mapping: • Identify available pins on the Deesbot board for servos and limit switches. • Configure the pin assignments to avoid conflicts with existing functions. 4. Dual Y-Axis Configuration: • Maintain the dual Y-axis setup, ensuring smooth synchronization between Y1 and Y2 motors. 5. G-code Command Expansion: • Expand the G-code library to handle new commands for controlling the additional servos and responding to limit switches. 6. Testing and Debugging: • Ensure all devices (motors, servos, and switches) work seamlessly with the modified firmware. • Provide documentation on how to load the firmware and use the new commands. Additional Details: