
A few months back, we acquired a Stromer ST2 E-bike along with a Thule Chariot bike trailer. The plan was to use the e-bike and trailer to get the kiddos to and from school. Since the ride was only 1.3 miles one way, an ebike and trailer seemed to make more sense than driving the car. Plus, the ride is a nice way to get some exercise.
The problem was, we needed a way to attach the bike trailer hitch to the bike. On a standard bicycle, you remove one of the nuts from the rear axle and slide the hitch over the rear axle on the outside of the frame and then reinstall the axle nut. This sandwiches the hitch to the frame and retains the rear axle for a simple and clean install. This installation method assumes the bike has extra length on the rear axle to accommodate the hitch.
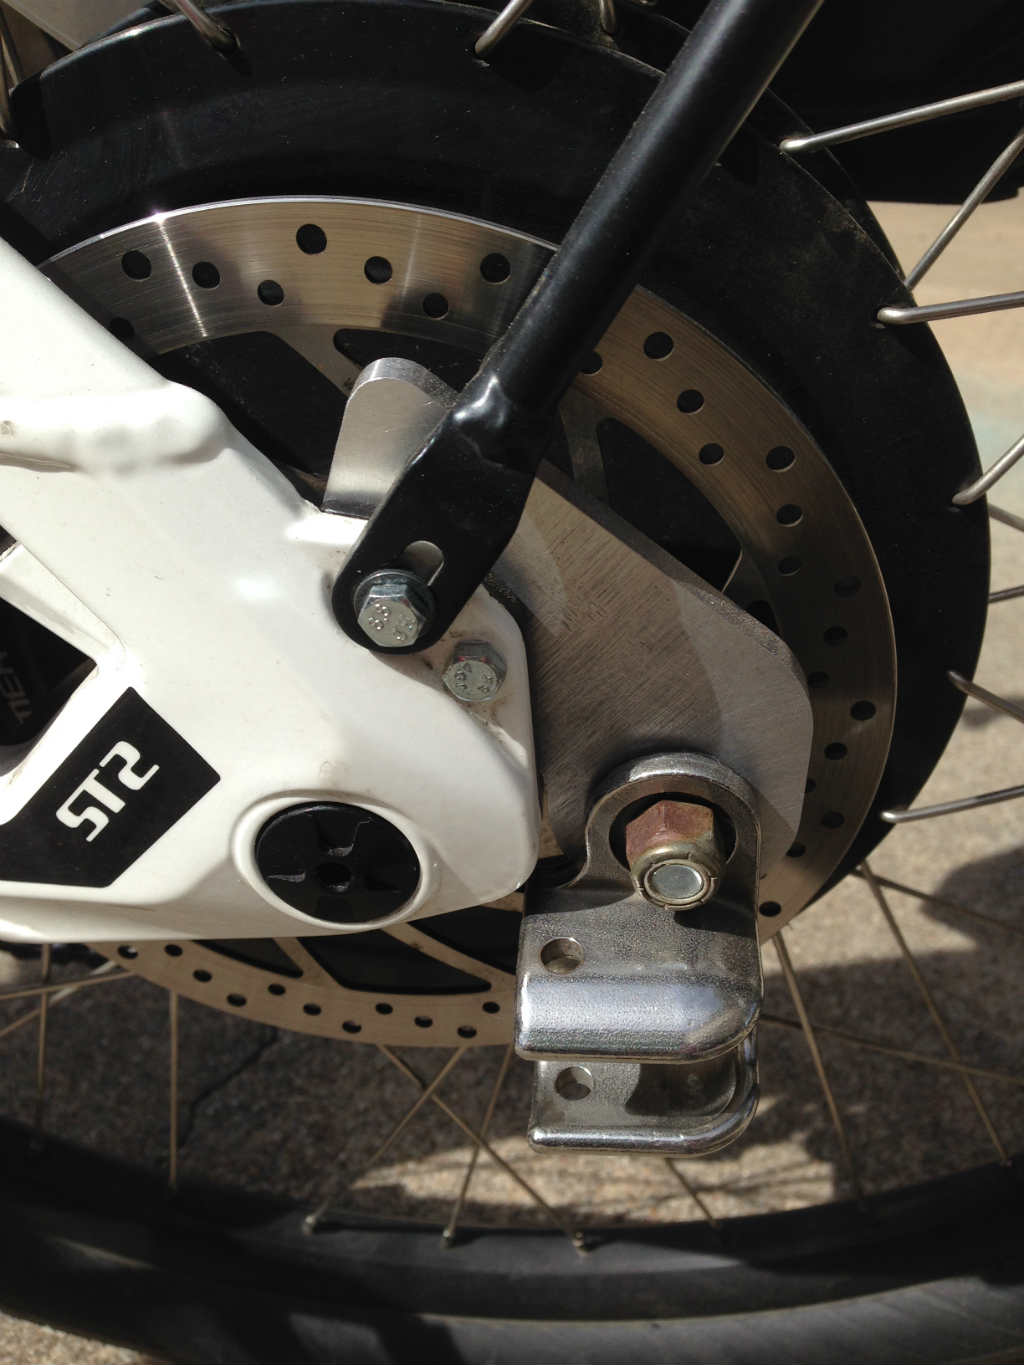
However, the Stromer ST2 does not use a traditional style rear axle. As you can see in the image above, the rear axle does not extend beyond the frame. This required an adapter plate to mount the hitch to the bike.
I found a commercially available version that retailed for $119.99 from Scooteretti. The price was more than I wanted to pay for a few plates of metal and fasteners, especially considering I have a CNC machine in my garage. So, I set out to design and build my own. I found a few write ups on the installation over at the Electric Bike Review forum. Click here to see the forum thread.
There was a design for a Stromer ST1 adapter plate but nothing for the ST2.
Affiliate Disclosure – Note some of the links on this page are affiliate links. If you purchase a product using one of the links, DIY Machining earns a small commission. There is not additional cost to you compared to purchasing directly from the linked site. Click here for more details about how we use affiliate links.
Stromer ST2 Hitch Plate Design
I started with a piece of cardboard cut from a cereal box. I used the bike itself and the hitch and created a template by slowly trimming the cardboard to the final dimension to fit the bike. Once I had the template, I could have traced this onto a piece of aluminum and cut it out by hand. However, I wanted to use my CNC mill. I took the template and created a CAD model in Fusion360 as well as the CAM and tool paths. An image of the part and tool paths is shown below.
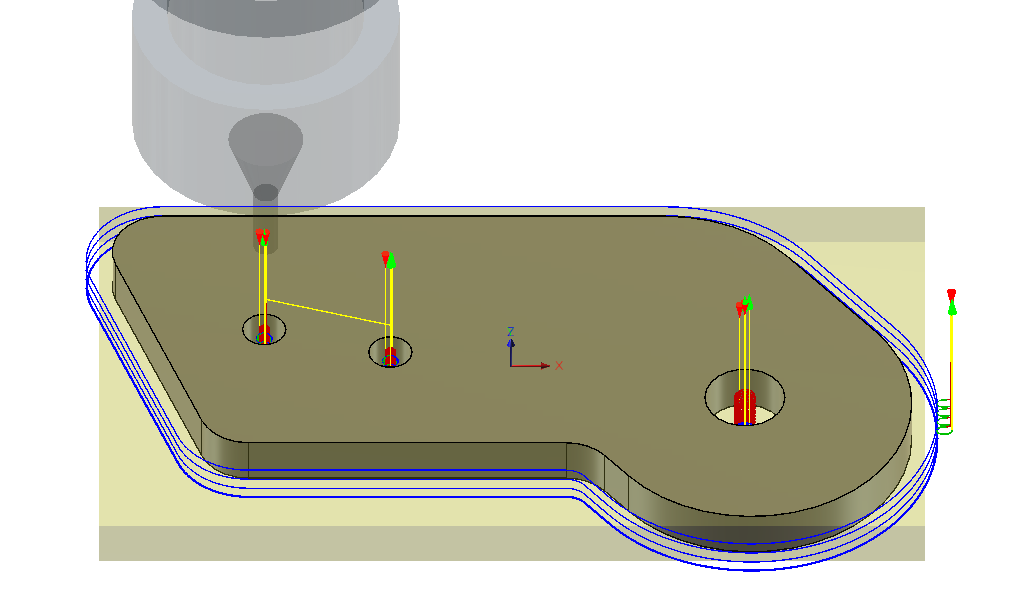
CAD & CAM for Stromer ST2 Hitch Plate
Fabrication
If you are interested in building your own, you can download the CAD, CAM, and Drawing below.
Click Here to Download the CAD, CAM & Gcode for the Stromer ST2 Hitch Plate
The download is a .zip folder that contains the following:
– Fusion360 File “Stromer_ST2_Hitch_Plate v8.f3d” – 143 KB
– Setup Sheet “Stromer_Hitch_Plate v6.html” – 87 KB
– Stromer_Hitch_Plate v8.step – 29 KB
– Stromer_Hitch_Plate_Drawing v8.pdf – 68 KB
The hitch adapter is made from 1/4 thick aluminum plate. I am not sure what series of aluminum but I suspect either 2024 or 7075. I am pretty sure it isn’t 6061 because of the way the material machined. Nonetheless, at 1/4 thick even if it is 6061, there is plenty of strength in the part. The total weight limit on the trailer is 100lbs.
Stock Size:
Length: 4.125
Width: 2.25″
Thickness: .25″
Material: Aluminum
Origin:
X & Y = 0 at the Center of the Aluminum Stock
Z = 0 at the top of the stock
Tooling
I used end mils equivalent to the following. Note, the links below are Amazon affiliate links. If you choose to purchase using these links, DIY Machining earns a small commission. The price to you is the same if you use the link or go directly to Amazon.
Tool 14 is a 1/4″ diameter 4 flute carbide end mill. This is used to create the large hole in the plate and cut the profile.
Tool 12 is a 1/8″ diameter 2 flute high speed steel end mill. This is used to cut the smaller bolt holes.
The 6 piece end mill set is a good value if you are just getting started. However, I am beginning to move to all carbide end mills. Even with the small CNC mill I have, there is a noticeable performance increase. I can take heavier cuts which reduces my overall machining time.
Installation
The installation was pretty simple. I did install the trailer hitch to the adapter plate before installing the adapter plate onto the Stromer ST2. I wanted the M10 bolt head to be on the inside closest to the break rotor. This maximized the clearance and put the larger nylock nut on the outside.
The hitch plate uses existing bolt holes on the bike. Since the original fasteners threaded into the bike, I purchased longer fasteners and used nylock nuts to ensure nothing vibrated loose. It was a little challenging to get the nuts between the adapter plate and brake rotor. However, I ended up using some painters tape to temporarily tape the nut to the wrench as I started threading the nut onto the bolt.

Stromer ST2 Hitch Plate Installation
Conclusion
Let me know if you decide to build your own. If you are interested in one like mine, send an email to me at Tim@DIYMachining.com I still have some material left from the original build.
Thanks for reading. Until next time… Tim
How do you set your tool height in universal g code sender ? Did you touch off your tools ?
Ah, good question. Universal Gcode Sender (UGS) does not store tool lengths. I reset my Z=0 each time I change a tool. I typically use the top surface of the part or vise jaw as my Z=0 reference when I create the gcode in Fusion360.
How do you do tool lengths , in Ugs ?
Bix, great question. I do not. I re-zero my z height at each tool change. I actually post my gcode programs based on the tool required. That is, if I have a program that uses two different size tools, I post all of the tool paths for tool 1 in a unique gcode file. Next, I generate a second gcode file with the tool paths for tool #2.